User Interface
The MySegmenter interface is organized into several panels that provide access to all tools and views.
Main dashboard
- The main dashboard is divided into five key areas:
- Sidebar: The sidebar provides quick access to the following modules:
- File Browser: Browse and load DICOM and STL files.
- Segmentation: Access all segmentation tools, including thresholding and segment editing.
- Measurement: Perform quantitative measurements: line distances, angles,curves, closed curves, and planes.
- Volume Rendering: Visualize volumetric data with advanced rendering options.
- Capture Video: Record and export 2D or 3D scene captures as video or image sequences.
- Crosshair: Synchronize all slice views to the same anatomical coordinate simultaneously.
- Settings: Configure application-wide preferences and behavior.
- Information: View system details and license status.
- Help: Open the official MySegmenter online documentation.
- Module Panel: Displays the controls and options for the currently selected module.
- Views: Interactive 3D and 2D (axial, coronal, sagittal) visualization windows.
- Logs: Displays real-time log messages for each application action.
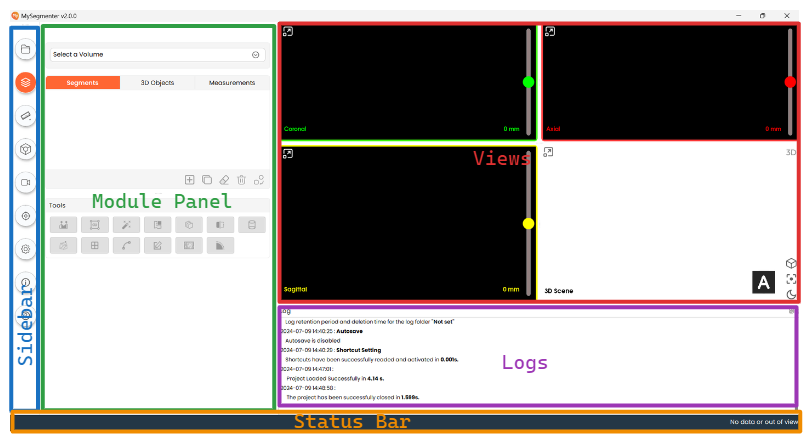
- Status bar: Displays status information such as autosave, view coordinates, etc.
- Sidebar: The sidebar provides quick access to the following modules:
Views
- MySegmenter provides four synchronized view types: Coronal, Axial, Sagittal, and 3D Scene.
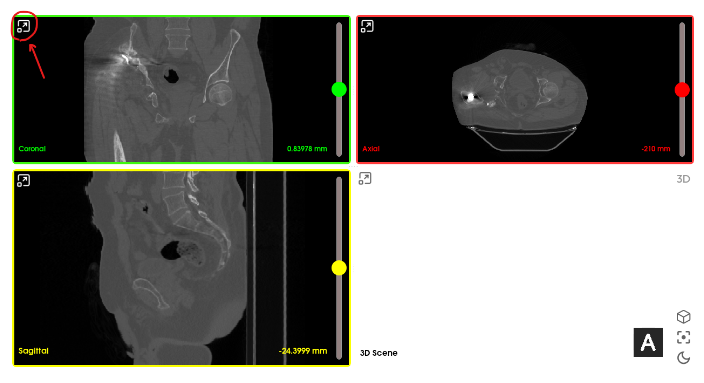
- Minimize/Maximize view: Click the button in the top-left corner of any view panel to maximize or restore it
- Reset field of view: Use sliders to navigate between different slices. To reset to the default slice of any 2D view, double right-click inside that view, a menu will appear, then click "Reset field of view".
- Pan: Pan the slice image to move around the view. In addition to the existing pan shortcuts,
the mouse Middle-click shortcut has been added: press and hold the middle mouse button and
drag inside any 2D view. This feature allows for easy navigation and precise control on 2D
view slice images.
- 3D views: The mouse Middle-click shortcut is also available to pan in the 3D view.
- Note: All the previous pan shortcuts are kept; only the new Middle-click shortcut has been added. No existing shortcut has been removed.
- 3D: Use the 3D toggle in the 3D view panel to enable or disable the 3D rendering.
- Center view: Click on the second to last option in the sidebar of the 3D view or right-click inside the 3D view, a menu will appear, then click "Center View" to position a model to the center.
- Orientation: To change the anatomical orientation of the 3D model, click the cube-shaped orientation widget and select the desired view angle.
- Change 3D background: Toggle the 3D view background between Light and Dark using the last icon in the 3D view sidebar.
Layout
- MySegmenter supports a variety of customizable layouts to suit different workflows. Refer to the video tutorial below for a detailed walkthrough of available layout options.
Status bar
- A progress bar appears in the status bar during autosave operations.
- Moving the mouse cursor within any 2D view displays the current image coordinates in the status bar.
New Release Notification
Get notified from inside the application when a newer release of MySegmenter is available.
- Previously, users had no way of knowing from inside the application that a newer release of MySegmenter exists; they had to visit the website to find out. MySegmenter now checks the server for the latest published version and notifies the user when the build they are running is out of date, so that they can download and install the update.
Note: The application downloads the installer and verifies its integrity, but does not install it or selfupdate. The installation remains a deliberate, manual action by the user.
Steps:
- Open MySegmenter
On application open, the application checks the server for the latest released version. The check happens a few seconds after the main window appears, so the application always opens normally. While the application stays open, it re-checks every 24 hours, so a version released during a long session is still noticed without restarting. If the server cannot be reached, or the reply cannot be read, nothing at all happens: no popup and no error message are shown.
- Review the Update Available popup
If the server’s version is newer, the "Update Available" popup is shown with the message "MySegmenter <new version> is available." and "You are running version <current version>."
- Select an option
Click Download, Later, or Don’t Show Again. The behavior of each option is described under Popup Buttons below.
- Wait for the download and verification
If Download was selected, the "Downloading Update" dialog shows the download progress. Click Cancel at any time to stop the download. The downloaded file is then verified automatically.
- Install the update
When the "Download Complete" message appears, note the full path where the verified installer was saved, close MySegmenter and run the installer. The application never runs the installer itself.
Additional Information
Update Available Popup
- Title: "Update Available", shown when a newer version exists.
- Message: one message text in two lines: "MySegmenter <new version> is available." and "You are running version <current version>."
- Buttons: one button group with three options: Download, Later, and Don’t Show Again
Popup Buttons
-
Download:
- Downloads and verifies the installer as described in Downloading and Verifying below.
- The popup closes.
- This is not treated as "handled": the popup will be shown again the next time the application opens, and will keep appearing until the user actually installs the new version.
-
Later:
- The popup closes and nothing is remembered.
- The popup will be shown again the next time the application opens, and at the next 4-hour check.
-
Don’t Show Again:
- The popup closes and this version is remembered as dismissed.
- The user is never shown the popup again for this version.
- If a newer version is released later, the popup will appear again for that newer version.
-
Closing the popup (X): Same as Later; nothing is remembered and the popup will be shown again.
Downloading and Verifying
- When the user chooses to download, from either the popup’s Download button or the Information page link, the application downloads the installer itself rather than opening a web browser.
- The download location supplied by the server is validated before use. Only secure (HTTPS) addresses on known MySegmenter distribution hosts are accepted. An address failing validation is not used, and no download is attempted.
- Download progress is shown, and the user can cancel at any time.
- The downloaded file is checked against the integrity checksum published by the server for that release.
- While downloading, the file is held under a temporary name and is given the installer’s real name only after the integrity check passes. A failed, mismatched, or cancelled download is deleted, so a file that has not been verified is never left where the user could mistake it for a valid installer.
- If no checksum is published for the release, no download is performed and the user is directed to the website.
- The application never runs the installer. On success, the user is told where the verified installer has been saved and starts the installation themselves.
Download Messages The following dialogs and messages can be shown during the download:
| Message | Description |
|---|---|
| Downloading Update | Progress dialog showing the download progress, with a Cancel button |
| Download Complete | States that the update was downloaded and its integrity verified,shows the full path where the installer was saved, and instructs the user to close MySegmenter and run the installer. |
| Verification Failed | States that the downloaded file did not pass integrity verification and has been deleted, and directs the user to the MySegmenter website. |
| Download Failed | Shown if the download could not complete or the verified file could not be saved; directs the user to the website. |
| Update Unavailable | Shown if no checksum is published for the release, meaning the download cannot be verified. |
Information Page Notification
-
A label is shown in red below the existing "Version" row of the Information page, with the text: "A new version <new version> is available. Click here for download".
-
Only "Click here" is a clickable link; the remaining text is plain red text.
-
The link is shown only when the download location passes validation.
-
The label is shown only when a newer version exists; nothing is shown when the application is up to date.
-
Whenever the application finds a newer version, it records the version, the download location, and the integrity checksum. The Information page reads that record to show the note and the "Click here" download link.
-
Activating the link downloads and verifies the installer in the same way as the popup’s Download button.
-
The Information page does not contact the server itself, so it opens instantly and works offline.
-
Once the user updates and the application is no longer out of date, the record is cleared and the red note disappears on its own.