User Interface
The MySegmenter interface is organized into several panels that provide access to all tools and views.
Main dashboard
- The main dashboard is divided into five key areas:
- Sidebar: The sidebar provides quick access to the following modules:
- File Browser: Browse and load DICOM and STL files.
- Segmentation: Access all segmentation tools, including thresholding and segment editing.
- Measurement: Perform quantitative measurements: line distances, angles,curves, closed curves, and planes.
- Volume Rendering: Visualize volumetric data with advanced rendering options.
- Capture Video: Record and export 2D or 3D scene captures as video or image sequences.
- Crosshair: Synchronize all slice views to the same anatomical coordinate simultaneously.
- Settings: Configure application-wide preferences and behavior.
- Information: View system details and license status.
- Help: Open the official MySegmenter online documentation.
- Module Panel: Displays the controls and options for the currently selected module.
- Views: Interactive 3D and 2D (axial, coronal, sagittal) visualization windows.
- Logs: Displays real-time log messages for each application action.
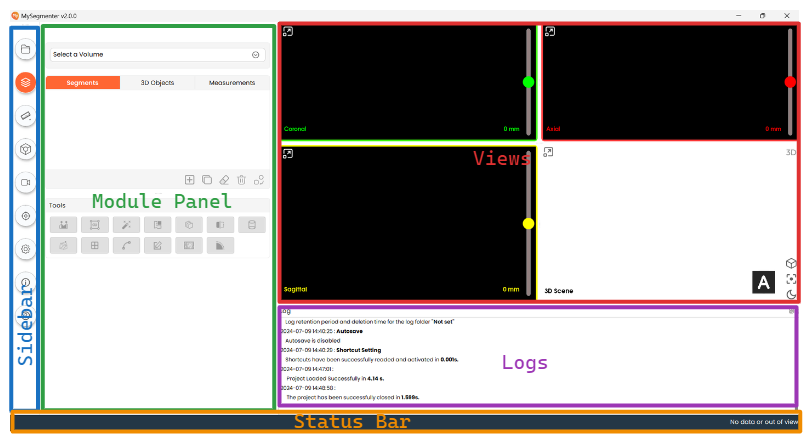
- Status bar: Displays status information such as autosave, view coordinates, etc.
- Sidebar: The sidebar provides quick access to the following modules:
Views
- MySegmenter provides four synchronized view types: Coronal, Axial, Sagittal, and 3D Scene.
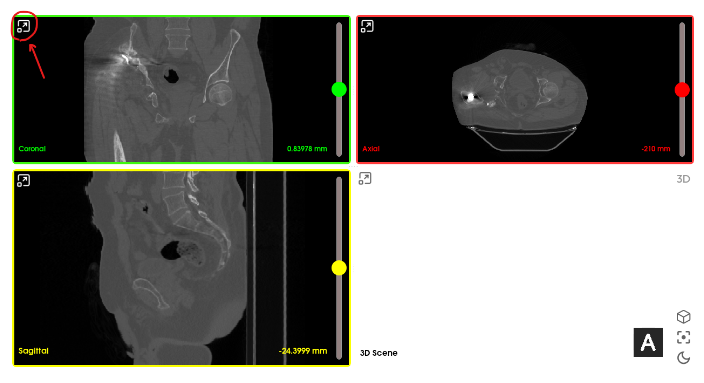
- Minimize/Maximize view: Click the button in the top-left corner of any view panel to maximize or restore it
- Reset field of view: Use sliders to navigate between different slices. To reset to the default slice of any 2D view, double right-click inside that view, a menu will appear, then click "Reset field of view".
- 3D: Use the 3D toggle in the 3D view panel to enable or disable the 3D rendering.
- Center view: Click on the second to last option in the sidebar of the 3D view or right-click inside the 3D view, a menu will appear, then click "Center View" to position a model to the center.
- Orientation: To change the anatomical orientation of the 3D model, click the cube-shaped orientation widget and select the desired view angle.
- Change 3D background: Toggle the 3D view background between Light and Dark using the last icon in the 3D view sidebar.
Layout
- MySegmenter supports a variety of customizable layouts to suit different workflows. Refer to the video tutorial below for a detailed walkthrough of available layout options.
Status bar
- A progress bar appears in the status bar during autosave operations.
- Moving the mouse cursor within any 2D view displays the current image coordinates in the status bar.